
Getting braces is a significant step in achieving a straighter smile, but there’s an important preliminary phase many patients experience first: the placement of orthodontic spacers. These small but crucial devices help prepare your teeth for the main event. Let’s explore everything you need to know about these temporary tooth separators.
What Are Orthodontic Spacers and Why Are They Used?
Orthodontic spacers (also called separators) are small devices placed between your teeth—typically your molars—to create tiny gaps before your braces are installed. They’re an essential preparatory step in many orthodontic treatment plans.
When you’re getting traditional braces, your orthodontist needs to place metal bands around your back teeth. These bands serve as anchors for the archwire that will gradually move your teeth into alignment. The challenge? Most people’s teeth naturally sit very close together, making it impossible to slip these bands into place without first creating some space.
This is where dental spacers come in. These small rubber rings or metal spring spacers work by gently pushing adjacent teeth apart over 1-2 weeks, creating just enough room for proper band placement when it’s time for your braces.
Who Needs Spacers Before Getting Braces?
Not everyone getting orthodontic treatment will need spacers. Your orthodontist might determine you don’t need them if:
- You naturally have adequate spaces between your back teeth
- You’re getting a type of orthodontic treatment that doesn’t use molar bands (like certain types of clear aligners)
- Your treatment plan has specific requirements that don’t necessitate creating additional space
During your initial orthodontic consultation, your orthodontist will examine your teeth and determine whether spacers are necessary as part of your personalized treatment plan.
Types of Orthodontic Spacers for Braces
There are two primary types of spacers used in orthodontic preparation:
Rubber Band Spacers vs. Metal Spring Spacers
Rubber Band Spacers:
– Most commonly used (typically blue rubber spacers)
– Small elastic rings made of latex or non-latex material
– More comfortable for most patients
– Easier for orthodontists to place and remove
– Used for typical cases requiring 1-2 weeks of separation
Metal Spring Spacers:
– Made of stainless steel in a spring-like configuration
– Used in specific cases requiring more force or durability
– May be preferred when more substantial space creation is needed
– Sometimes used when a patient has an allergy to rubber materials
– Can be more noticeable when smiling or talking
Your orthodontist will select the appropriate type based on your specific needs, tooth structure, and the goals of your treatment plan. Most patients receive the standard small rubber rings, but your orthodontist will explain if metal spacers would be more beneficial in your case.
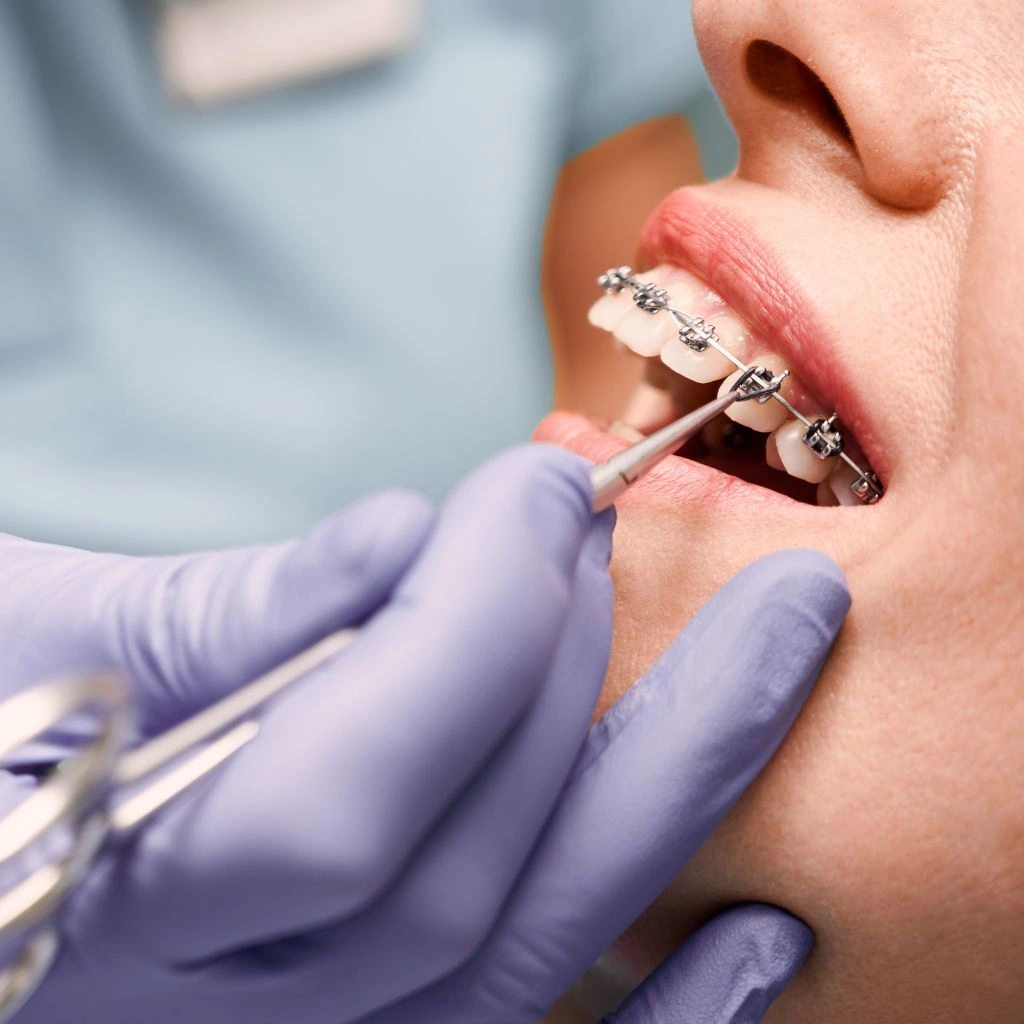
The Spacer Placement Process and What to Expect
The spacer insertion process is relatively quick and straightforward. Here’s what typically happens during your spacer appointment:
- Your orthodontist will identify where spacers need to be placed (usually between molars)
- Using specialized tools or dental floss, they’ll stretch the rubber spacer
- They’ll carefully slide the spacer between the targeted teeth
- The spacer will apply gentle but consistent pressure
The entire spacer placement procedure usually takes just 10-15 minutes. You’ll feel pressure as each spacer is positioned, which might cause mild discomfort, but the process isn’t typically painful.
After placement, you’ll experience a sensation of pressure between your teeth where the spacers are working. This is normal—it’s a sign that the spacers are doing their job of creating space between teeth that were previously touching.
How Spacers Are Removed
After 1-2 weeks, when the spacers have successfully created enough space, they’ll be removed right before your braces are installed. The removal process is even quicker than placement:
- Your orthodontist uses a small tool to hook and gently pop out each spacer
- If the spacers have worked effectively, removal should be relatively painless
- In some cases, spacers may fall out on their own before your appointment (which we’ll discuss later)
Immediately after removal, your orthodontist will proceed with fitting the molar bands and installing your braces.
Managing Pain and Discomfort with Spacers
Let’s be honest—while spacers are essential, they can cause discomfort. The good news is that any pain is temporary and manageable.
When spacers are first placed, you’ll likely feel pressure and soreness between the teeth where they’re located. This is because the spacers are actively pushing teeth apart, creating tension in the periodontal ligaments that hold your teeth in place.
Most patients find that discomfort peaks within the first 2-3 days after placement and then gradually diminishes. By the end of the first week, many people hardly notice their spacers anymore as their teeth adjust to the new positioning.
Do Spacers Hurt More Than Braces?
Many patients report that spacers cause more intense initial discomfort than braces themselves. This is because spacers are actively creating space between teeth that naturally want to remain close together.
The good news? Spacer discomfort is very temporary (usually peaking for just 2-3 days), while braces discomfort tends to be milder but more prolonged. Think of spacers as a short-term challenge compared to the longer but gentler adjustment to braces.
Effective Pain Relief Options for Orthodontic Spacers
If you’re experiencing discomfort from your spacers, several approaches can help:
Medication options:
– Over-the-counter pain medication like acetaminophen (Tylenol) or ibuprofen (Advil, Motrin) taken as directed
– Take medication before pain peaks rather than waiting for severe discomfort
Temperature therapy:
– Apply a cold compress or ice pack to the outside of your cheek for 10-15 minutes
– Enjoy cold foods or beverages (ice cream, yogurt, smoothies) which can numb the area
Rinses and dietary adjustments:
– Rinse with warm salt water (1 teaspoon salt to 8 ounces water) several times daily
– Stick to soft foods that don’t require heavy chewing
Your orthodontist might recommend against using topical oral numbing gels, as these can sometimes irritate gum tissue and wear off quickly.
Living with Spacers: Eating, Cleaning, and Common Problems
During the 1-2 weeks you have spacers, you’ll need to make some temporary lifestyle adjustments to ensure they stay in place and work effectively.
What Foods to Eat and Avoid with Spacers
Proper eating with spacers requires some dietary modifications:
Foods to avoid:
– Sticky foods (caramel, gum, taffy, chewy candies)
– Hard foods (nuts, hard pretzels, popcorn, raw carrots)
– Chewy foods (bagels, tough meats, crusty bread)
– Foods requiring excessive biting force or manipulation
Recommended foods:
– Yogurt, pudding, and soft dairy products
– Pasta, rice, and cooked grains
– Soups and broths
– Smoothies and protein shakes
– Mashed potatoes and soft vegetables
– Scrambled eggs and soft breakfast foods
Cold foods have the added benefit of helping to reduce discomfort by numbing the area. This makes ice cream and cold yogurt particularly helpful during the first few days with spacers.
Oral Hygiene with Spacers
Maintaining good oral hygiene with spacers is important but requires some adjustments:
- Continue brushing normally twice daily with a soft-bristled toothbrush
- Brush gently around the spacers to avoid dislodging them
- Avoid flossing between teeth where spacers are located
- Consider using a saltwater rinse or alcohol-free antimicrobial mouthwash to keep the area clean
- If recommended by your orthodontist, use orthodontic wax if a spacer is causing irritation against your cheek
These temporary changes to your oral hygiene routine help ensure your spacers stay in place while keeping your mouth clean and healthy.
What to Do if Spacers Fall Out
It’s not uncommon for spacers to fall out before your braces appointment. Here’s how to handle this situation:
- If spacers fall out within 1-2 days of your scheduled braces appointment, it often means they’ve successfully created enough space. In this case, you typically don’t need to worry.
- If spacers fall out earlier in the process (several days or a week before your appointment), contact your orthodontist. They may want you to come in for replacement of the spacers to ensure adequate space is created.
- If only some spacers fall out while others remain in place, still contact your orthodontist for guidance, as the treatment plan may need adjustment.
Never try to replace spacers yourself, as improper placement could cause discomfort or ineffective spacing.
Spacers vs. Other Orthodontic Devices
Spacers are just one component in the orthodontic treatment process, and they serve a specific purpose that’s different from other devices you might encounter.
How Spacers Differ from Rubber Bands Used During Braces Treatment
Though they may look similar at first glance, spacers and the elastics used during braces treatment serve completely different purposes:
| Characteristic | Orthodontic Spacers | Orthodontic Elastics (Rubber Bands) |
|---|---|---|
| Timing in treatment | Before braces are placed | During braces treatment |
| Purpose | Create space between teeth | Connect different parts of braces to correct bite issues |
| Duration | Temporary (1-2 weeks) | Worn for months during treatment |
| Placement | Between teeth | Hooked between brackets/bands |
| Replacement | Only if they fall out prematurely | Multiple times daily by the patient |
| Control | Managed entirely by orthodontist | Partially managed by patient |
Unlike spacers, which are placed before braces as a preparatory step, elastics are an active component of braces treatment that helps correct bite alignment and is typically used later in the orthodontic process.
Understanding these differences can help you track your progress through different phases of orthodontic treatment, from preparation with spacers to the active treatment with braces and elastics.
As you prepare for your orthodontic journey, remember that spacers represent just a brief phase—typically lasting only 1-2 weeks—before you receive your braces. While they may cause temporary discomfort, they’re an important step toward achieving the beautiful smile you’re working toward.